
개요
들어가기 앞서 간단하게 이론을 설명하자면, 바이트 코드는 가상 머신에서 돌아가는 언어를 의미합니다.
가상 머신(Virtual Machine, VM)은 바이트 코드를 돌리기 위한 인터프리터라 생각하시면 편합니다.
즉, 중간 표현(IR)의 하위 개념이며, 바이트 코드 대신 상위 개념인 IR으로 사용하기도 합니다.
일반적으로 후술할 opcode(명령코드)가 0개 이상의 매개 변수를 가지고 있고, opcode가 1바이트 크기를 가지고 있다면 바이트 코드라 불립니다.
자바(Java)로 예를 들자면, 일반적으로 자바 소스 코드를 컴파일한다고 합니다. 이는 기계어로 번역되는게 아닌 바이트 코드로 컴파일되며(.class), 이는 JVM(Java Virtual Machine, 자바 가상머신) 위에서 돌아갑니다.
이 글에서 만들어볼 바이트 코드와 가상 머신은 바이트 코드에 대한 간단한 추상화와, 스택 기반(Stack based) 가상 머신을 만들어 볼 예정입니다.
전체 코드는 Rust Playground에서 확인할 수 있습니다.
Opcode (Operation code, 명령 코드)
바이트 코드의 핵심이 되는 개념이며, 어셈블리어의 명령어와 비슷한 모양을 하고 있습니다.
우리가 구현해볼 명령 코드는 아래와 같습니다:
(스택에 대해 이해가 잘 안된다면, 후술할 가상 머신 구현을 먼저 읽어봐도 됩니다.)
Noop(0x00): 아무것도 하지 않습니다.Add(0x01): 스택의 맨 위 요소(Top Of Stack, TOS라 불리기도 합니다.) 두 개를 더한 다음,Push합니다.Push <value>(0x02): 값(value)을 스택에push합니다.Print(0x03): 스택의 맨 위 요소를pop한다음, 그 값을 출력합니다.PrintC(0x04):Print와 동일하나, 값을char형식으로 출력합니다.Jump <pointer>(0x05): 현재 포인터(current pointer)를<pointer>로 이동합니다.JumpIfFalse <pointer>(0x06): 맨 위 요소를pop한다음, 그 요소가0(false)이라면<pointer>로Jump합니다.
간단한 바이트 코드라 이론 설명 및 기본적인 명령어 설명에 집중되기 때문에, 나머지는 직접 구현해보시길 바랍니다.
1
2
3
4
5
6
7
8
9
10
11
12
13
14
pub type Value = isize;
pub type Pointer = usize;

#[derive(Debug, Clone, PartialEq)]
#[repr(u8)]
pub enum Opcode {
    Noop = 0x00,
    Add = 0x01,
    Push(Value) = 0x02,
    Print = 0x03,
    PrintC = 0x04,
    Jump(Pointer) = 0x05,
    JumpIfFalse(Pointer) = 0x06,
}
이렇게 구현된 Opcode를 집합해둔(명령 집합, Instruction Set) 구조체인 Program을 구현할 수 있습니다:
1
2
#[derive(Debug, Clone, PartialEq)]
pub struct Program(Vec<Opcode>);
필수는 아니지만, 시각적으로 보기 편하게 Display를 구현해봅시다:
1
2
3
4
5
6
7
8
9
10
11
12
13
14
15
16
17
18
19
20
use std::fmt;

impl fmt::Display for Program {
    fn fmt(&self, f: &mut fmt::Formatter<'_>) -> fmt::Result {
        for (index, opcode) in self.0.iter().enumerate() {
            write!(f, "{index:01x}: ")?;
            match opcode {
                Opcode::Noop => write!(f, "Noop")?,
                Opcode::Add => write!(f, "Add")?,
                Opcode::Push(value) => write!(f, "Push {value} (0x{value:01x})")?,
                Opcode::Print => write!(f, "Print")?,
                Opcode::PrintC => write!(f, "PrintC")?,
                Opcode::Jump(pointer) => write!(f, "Jump ptr {pointer}")?,
                Opcode::JumpIfFalse(pointer) => write!(f, "JumpIfFalse ptr {pointer}")?,
            }
            writeln!(f)?;
        }
        Ok(())
    }
}
추가적으로, From<&str>을 구현해볼 수 있습니다:
1
2
3
4
5
6
7
8
9
10
11
12
13
14
15
16
17
18
19
20
21
22
23
24
25
26
27
28
29
30
31
32
33
34
35
36
37
38
39
40
impl From<&str> for Program {
    fn from(s: &str) -> Self {
        let mut program = Vec::new();
        let mut iter = s.split_whitespace();

        while let Some(opcode) = iter.next() {
            match opcode {
                "00" => program.push(Opcode::Noop),
                "01" => program.push(Opcode::Add),
                "02" => {
                    let value = str_to_isize(iter.next().unwrap());
                    program.push(Opcode::Push(value));
                }
                "03" => program.push(Opcode::Print),
                "04" => program.push(Opcode::PrintC),
                "05" => {
                    let value = str_to_usize(iter.next().unwrap());
                    program.push(Opcode::Jump(value));
                }
                "06" => {
                    let value = str_to_usize(iter.next().unwrap());
                    program.push(Opcode::JumpIfFalse(value));
                }
                _ => panic!("Unknown opcode: {}", opcode),
            }
        }

        Self(program)
    }
}

#[inline(always)]
pub fn str_to_isize(s: &str) -> isize {
    isize::from_str_radix(s, 16).unwrap()
}

#[inline(always)]
pub fn str_to_usize(s: &str) -> usize {
    usize::from_str_radix(s, 16).unwrap()
}
실제로 구현할땐 데이터를 표현하기 위해,
Endian을 사용해야 합니다. 위 코드는 예시를 들기 위한 코드입니다.
스택 (Stack)
스택 구조체는 간단하게 구현했을땐 구현하기 쉽습니다:
1
2
3
4
5
6
7
8
9
10
11
12
13
14
15
16
#[derive(Debug, Clone, PartialEq)]
pub struct Stack(Vec<Value>);

impl Stack {
    pub fn new() -> Self {
        Self(Vec::new())
    }

    pub fn push(&mut self, value: Value) {
        self.0.push(value);
    }

    pub fn pop(&mut self) -> Option<Value> {
        self.0.pop()
    }
}
가상 머신 (Virtual Machine, VM)
먼저 전체 코드를 첨부한 후 설명하겠습니다:
1
2
3
4
5
6
7
8
9
10
11
12
13
14
15
16
17
18
19
20
21
22
23
24
25
26
27
28
29
30
31
32
33
34
35
36
37
38
impl Program {
    pub fn vm(&mut self, stack: &mut Stack) {
        let mut ptr = 0;

        while let Some(opcode) = self.0.get(ptr) {
            match opcode {
                Opcode::Noop => {}
                Opcode::Add => {
                    let a = stack.pop().unwrap();
                    let b = stack.pop().unwrap();
                    stack.push(a + b);
                }
                Opcode::Push(value) => stack.push(*value),
                Opcode::Print => {
                    let value = stack.pop().unwrap();
                    println!("{value}");
                }
                Opcode::PrintC => {
                    let value = stack.pop().unwrap();
                    let c = std::char::from_u32(value as u32).unwrap();
                    print!("{c}");
                },
                Opcode::Jump(pointer) => {
                    ptr = *pointer;
                    continue;
                }
                Opcode::JumpIfFalse(pointer) => {
                    let value = stack.pop().unwrap();
                    if value == 0 {
                        ptr = *pointer;
                        continue;
                    }
                }
            }
            ptr += 1;
        }
    }
}
한번쯤 난해한 언어(Esolang)에 관심을 가지고 직접 구현해본적이 있다면, 위 코드는 익숙하실겁니다. (BF 같은)
각 명령어 구현에 대해선 앞서 설명하였기 때문에, 따로 설명하진 않겠습니다.
예제
1
2
3
4
5
6
7
8
9
10
11
12
13
14
15
16
17
18
19
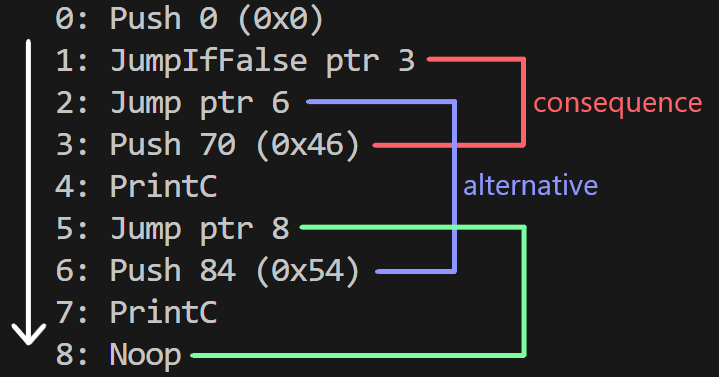
/*
index | opcode (hex) | description
index 0 => 02 00 (dec 0) : push 0
index 1 => 06 03 (dec 3) : jump to index 3 if top of stack is 0
index 2 => 05 06 (dec 6) : jump to index 6
index 3 => 02 46 (dec 70) : push 70
index 4 => 04 : print character (dec 70 = 'F')
index 2 => 05 08 (dec 8) : jump to index 8
index 6 => 02 54 (dec 84) : push 84
index 7 => 04 : print character (dec 84 = 'T')
index 8 => 00 : noop
*/
let mut program = Program::from("02 00 06 03 05 06 02 46 04 05 08 02 54 04 00");
let mut stack = Stack::new();
println!("{program}");
program.vm(&mut stack);
그냥 기계어로 빌드하면 될걸, 왜 굳이 바이트 코드(가상 머신)를 사용하는가
일단 바이트 코드(가상 머신)를 쓰는게 느려진다는건 누구나 아는 사실입니다.
그래도 쓰는 이유는 호환성 때문인데, 만약 기계어로 빌드해야 한다면 여러 운영체제와 아키텍쳐에 맞게 따로 구현해둬야 합니다. 또한, 각각의 환경에 따라 언어의 성능이나 기능이 달라질 수 있기 때문에, 이런점에서 호환성이 크게 떨어질 수 있습니다.
하지만 가상 머신을 쓴다면, 굳이 이런걸 생각할 필요 없이 가상 머신만 잘 만들면 되기 때문에, 호환성 면에선 상당히 효율적입니다. 물론 이에 따른 성능 저하나 오버헤드 등이 있기 때문에, 기계어보다 꽤나 느립니다.